
Apple has released the most recent version of macOS, which is called Ventura. However, after installing the macOS Ventura update, several users report files are missing. When a new update doesn’t go as planned, many customers find themselves in a state of panic because they’ve lost their data. This may be quite stressful. Yet, this article specifically addresses how to recover lost files after macOS Ventura update, because there are many reasons to lose files such as interrupted updates, downloading the update from unreliable sources, power, or internet instability, and corrupted files.
Part 1: Fascinating new features in macOS Ventura
Before diving into the steps of how to recover lost files after themacOS Ventura update, first, check out what’s new about this macOS Ventura update.
- With macOS Ventura, the interface has never been fresher, clearer, or more contemporary.

- The enhanced Home app experience is better than ever; you can see and manage your accessories more clearly, and the UI has become even simpler to comprehend.
- With macOS Ventura, new group tab management features will be available. By sending the list of tabs to your friends, you may allow them to see it and even add new tabs. They can be pinned as well. Additionally, Safari nowadays can translate websites into many more languages.
- By concentrating more on it, you may prioritize your job, and the Stage Manager’s additional capabilities will be of assistance.
- Many new applications and functions in macOS Ventura will enhance your Mac experience. For instance, the Clock app was formerly exclusive to the iPhone and iPad, but the most recent version included support for the Mac. You may now set alarms and get notifications directly from your Mac.

Part 2: How to Recover Lost/Missing Files After macOS Ventura Update?
Solution 1: Recover Lost/Missing Files after the macOS Ventura Update with 4DDiG
It is hard to restore permanently erased Mac data without third-party recovery software if you don’t have a backup. You may use this page to test out the 4DDiG Mac Data Recovery program to recover lost, damaged, hidden, or corrupted data. It can recover data with a high recovery rate even if you have cleared your Trash bin or erased the contents permanently from your storage device.
Additionally useful are these advantages of using the 4DDiG Mac Data Recovery tool besides recovering missing files after the macOS Ventura update:
- Find and retrieve files from internal and external disks, trash, SD cards, USB devices, Mac-based equipment, and digital cameras.
- The sophisticated technique it employs makes it easy to retrieve hidden data.
- retrieves over 1000 file types, including documents, pictures, videos, and audio.
- Data from any or encrypted macOS versions may be recovered.
The steps are listed below for recovering data after the macOS Ventura update:
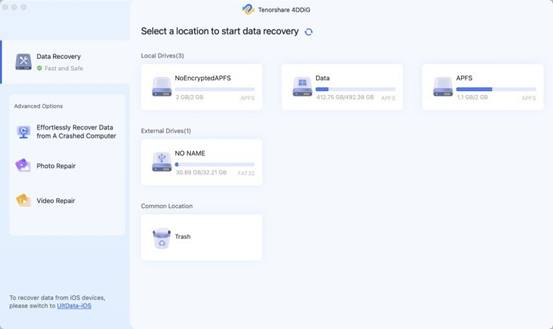
- Choose the Drive for Deleted Files.
Open 4DDiG-Mac and choose the disk containing the deleted data.
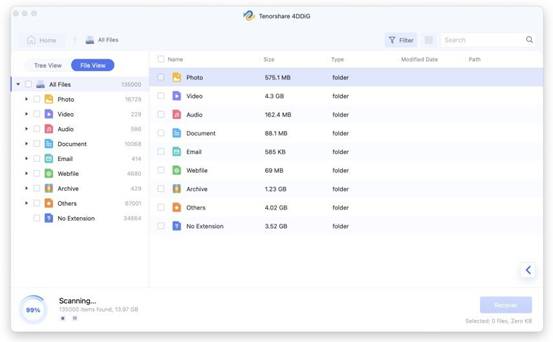
- 4DDiG quickly scans the whole chosen disk for lost data; once you’ve located the files you wish to recover, you may halt or end the search at any moment.
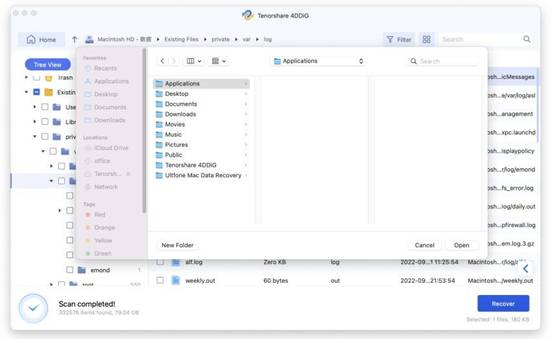
- After the target files are found, you may preview them and recover them in a safe place that is often different from the original one.
Solution 2: Recover Lost Files on Mac from Time Machine
To restore from Time Machine if you have it set up and running, follow these steps to recover lost files after the macOS Ventura update:
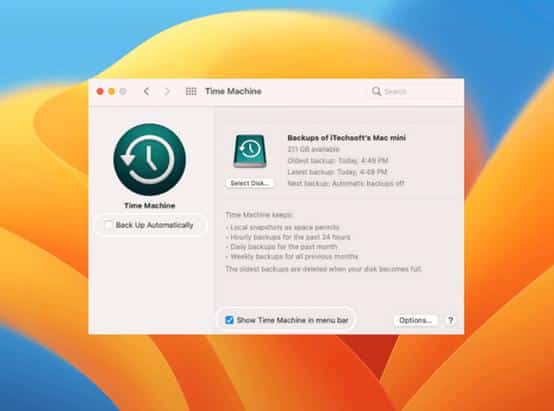
- Via Dock or Launchpad, launch Time Machine.
- Find “Time Machine” from the menu bar and click on it to enter.
- In the timeline, locate the directory or file you want to recover.
- First, choose Restore from the menu.
- Complete the recovery procedure by following the instructions.
However, you need to already set the Time Machine up and running to use it as a recovery tool.
Solution 3: Retrieve Missing Files of Mac via iCloud
Your lost files could be on iCloud Drive if you have that feature activated. After missing files after the mac update Ventura, you may restore lost data from iCloud:
1. Open iCloud Drive. Next, go to Account Settings and see the left corner for Advanced. Tap Restore Files.
2. The list of deleted files that may be retrieved might not appear right away.
3. Click Restore after selecting the files you want to restore.
Yet, the downside is that iCloud Drive data are kept for 30 days in the deleted cache.
Solution 4: Get Mac’s Files Back with Apple Support
Try contacting Apple support if you’re still having trouble finding your files. After you update to macOS Ventura, they may assist you with recovering lost data.
On the official website, you may open a ticket with their support staff, who will work with you to recover missing files after upgrading to macOS Ventura.
The only drawback would have to wait for a response to your ticket.
Bonus Tips: Other Common Problems after macOS Update
Some users lost some of their images after the macOS upgrade. Other issues include lost 32-bit Adobe products, lost emails, missing Dock, and lost album art. For these issues, you may try restarting your Mac and downgrading for applications like Adobe.
FAQs about Lost/Missing Files Recovery:
1. How Do I Recover Files after Update Mac?
You can easily recover lost files after the macOS Ventura update with data recovery tools like 4DDiG, via Time Machine, and iCloud backup.
2. How Do I Get My Files Back after the Update?
You can try to recover them from your Trash bin, check out your manual system backup or iCloud drive, you can ask for help from Apple support, or quickly recover missed files with third-party recovery tools such as Tenorshare 4DDiG.
3. How Do I Recover Lost Files on My Mac?
For the quickest and best solution, you can try data recovery tools designed for Mac such as Tenorshare 4DDiG.
4. Why Did My Mac Delete All My Documents?
You might be lost your files because of the macOS Venatura update so check out ways to recover lost files after the macOS Ventura update above.
Conclusion
If you are missing files after the mac update Ventura, there is no need for an alarm. Consider using 4DDiG macOS data recovery for quick and thorough data retrieval besides these built-in solutions.


