
There are some bloggers want to transfer their blog shared hosting to VPS Hosting Like Digital ocean, Vultr, etc because of Their raw power, High Speed and affordability. So Here I will tell you how to install WordPress on Debian, Ubuntu with Nginx.
Why Nginx server?
Nginx server is one the best server for a wordpress website. It is an open-source web server also used as a reverse proxy, HTTP cache, and load balancer. Nginx can handle high visitor even low ram.
Features Of Nginx:
- Reverse proxy with caching
- Super Fast
- Load balancing
- WebSockets
- Handling of static files, index files, and auto-indexing
- Support Free SSL
One Command To Install WordPress With Easyengine
EasyEngine is one of the popular auto installer scripts for LEMP stack (Linux, Debian, Nginx, MySQL, PHP) without Graphics User Interface (GUI) and more using Command Line Interface (CLI). The GUI on EasyEngine is only available for phpmyadmin only. Furthermore, we have to use the client for the command execution on EasyEngine.
Features Of Easyengine
- Support PHP 7.3
- Open Source Updatable server
- High Speed
- No need to extra coding
- Let’sEncript Free SSL Support
Supports OS
- Ubuntu 14.04, 16.04, 18.04
- Debian 8
Port Required
There are several ports that will be used by Easyengine, including:
- 22 / TCP (Inbound / Outbound): Standard SSH port
- 80 / TCP (Inbound / Outbound): Standard HTTP port
- 443 / TCP (Inbound / Outbound): Standard HTTPS port
- 22222 / TCP (Inbound): To access EasyEngine admin tools
- 11371 / TCP (Outbound): To connect to GPG Key Server
Read More:
- Simple Way To Install WordPress On Digital Ocean
- How To Get Free VPS On Digital Ocean Without Credit Card
1. Fresh Install Ubuntu or Linux or Debian
At first, you have to install one of recommended OS on your VPS server. If you don’t know you can contact support your hosting provider and ask them to install a fresh OS on your server.
2. Update your DNS record
After installed you need to add your server or hosting IP address to the domain name. For that login to your domain panel and remove all old NS and IP address and update with your new IP address.
How to add an IP address?
Just go to your domain DNS management panel > add A record> Add Host as your IP address and save it.
If you are Cloudflare user then log in your Cloudflare account > DNS > change the A record to new Ip address.
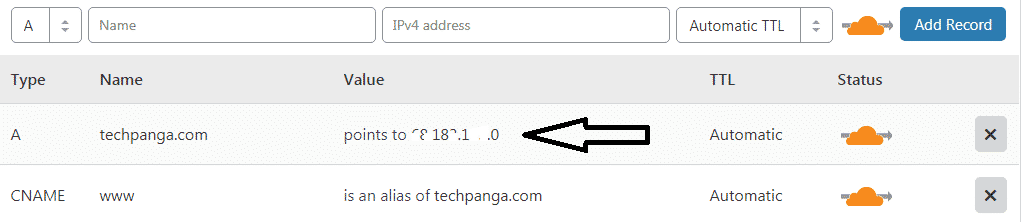
And Also www Cname on your domain panel or Cloudflare.
Note: Cloudflare user must be disabled Crypto to install SSL properly.
3. Login Server using SSH application Putty
Before we enter the Easyengine install process we must remotely server. For Linux and Mac users can directly use,Terminal while Windows users must use Putty.
You can download Putty application here. Make sure to install it.
To Login Putty
Open Putty > enter the IP address or you can copy paste IP address by right click of your mouse > enter username as root > enter password. > hit Enter button on the keyboard.
4. Install Nginx Server with Easyengine
Now we have succeeded in remoting our VPS, then we need the installer file from Easyengine then we run the installer file. If the index has not previously been updating your operating system locale packages we recommend to perform an update and upgrade advance. Use the following commands. Copy-Paste and hit enter on Putty.
sudo apt-get update && sudo apt-get upgrade -y
Currently, all the packages in your operating system have been successfully updated, now we download the installer then run the installer:
wget -qO ee rt.cx/ee4 && sudo bash ee
The install process will take quite a long time, depending on the speed of your VPS internet. Because the install process will take directly from the Ubuntu repository.
5. Install WordPress WIth PHP7.3 with Free SSL
Easyengine has been installed on our system along with all the packages needed, then we will install WordPress on Easyengine. Use the following command to begin the installation process:
1.Wordpress with Free Let’s Encrypt SSl ( Recommended)
ee site create example.com --type=wp --php=7.3 --ssl=le
2. WordPress Without SSL
ee site create example.com --type=wp --php=7.3
You need to understand that example. com can you change it according to the domain name you have, for example, I use an example.com.
Wait for a moment until the process is done.

If the installation process is complete it will appear, as shown above, you will get information about your username and password to log in to your WordPress Dashboard, you will also get the HTTP Auth username and password when accessing Easyengine admin tools. You can now access WordPress through your domain.
For Let’s Encrypt user
Free let’s encrypt SSL expires in 90 days so you must renew the license or if you want to renew your license automatically then just run this simple command.
0 12 * * * ee site update --le=renew --all 2> /dev/null # Renew letsencrypt SSL cert. Set by EasyEngine
Now you are done your WordPress blog ready to use. To manage your blog go this link yourdomain.com/wp-admin and enter your login details. One thinks if your WordPress blog was not working then open your VPS by the WinSCP and go to this folder /var/www/html/ and delete the index.php file.


