
Xiaomi’s Redmi 4A is one of the best-priced android smartphones on the market. If you want a smartphone that has fast performance and can handle general activities like social media music and gaming then xiaomi redmi 4a is the best choice.
I would not suggest if you’re a photography buff and selfie to acquire this smartphone. But besides that here I will show you how to root Redmi 4A in a few easy steps. Although all the way root Xiaomi phone the same. First, you need to open the bootloader using special software then afterward you can do root.
Warning: Flashing Super Su can potentially make boot loop your device. We are not responsible for any errors or problems caused by following this guide. Do it at your own risk. Early Root Method for Snapdragon variant of Redmi 4A
NOTE: Back up all your data including messages, contact files, images, etc.
Table of Contents
A. Download Tools and Materials
- Download and install Universal ADB Driver
- Download ADB FILES
- Download TWRP Recovery
- Download SuperSu.Zip
- Download Mi Unlock Tool
B. Preparation
- Unzip ADB.zip and you will get an ADB Folder
- Install ADB Driver on your PC
C. Unlock Bootloader in Redmi 4A
- Sign in to MiUnlock, Sign in with your Mi ID and Request Unlock Bootloader By reason of wanting to flash due to viruses for example.
- You will get a confirmation on your phone via SMS after a few days.
- Once you get the confirmation Unzip the MiFlashUnlock_1.1.0317.1_en.zip file
- Run MiFlashUnlock.exe, and Login to your Mi-Account
- Turn off your phone, and hold down the Volume down key and Power button to enter Fastboot mode.
- Then Connect your phone to PC using the USB cable and click “Unlock”.

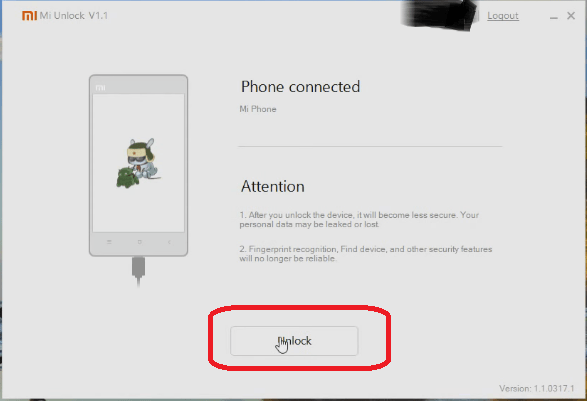
- Once the unlock process finishes finish press the reboot button
- Do not forget your computer must also connect to the Internet.
Read More: 5 Best Ad blocker for Android – Block Ads & Pop-Ups
D. Enable USB Debugging and OEM Unlock
- Enable Developer options. How to Settings> About phone> tap MIUI version 7 times.
- Enable USB Debugging Settings. How to> Additional settings> Developer options> USB Debugging and enable.
- Enable OEM Unlock. How to Settings> Additional settings> Developer options> Enable OEM Unlock.
E. Install TWRP Recovery at Redmi 4A
- First, connect your Redmi 4A to your PC via USB cable.
- Copy and paste the SuperSu zip file from your PC into internal Redmi 4A memory.
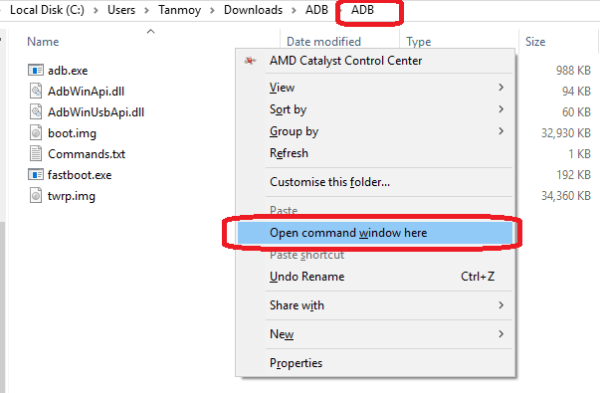
- Open the ADB Folder.
- Inside the folder, hold down “Shift” then right click and select “Open command Windows here”.
- The command prompt will open.

- Now enter this command.
adb devices - If connected to your PC correctly, the screen will display your device’s port id with some alphanumeric characters.
- Now turn off the frame.
- Then press and hold the Vol Down and Power button until boot up in fastboot mode.
- Now run this command.
fastboot devices - If ADB is installed correctly, The screen will display your device with some alphanumeric characters
- Now it’s time to flash TWRP, run this command (Make sure the twrp.img file is in the ADB folder as I did in Step B)
fast boot flash recovery twrp.img - When finished again run this command to boot into TWRP mode
fast boot boot twrp.img - The phone will boot into TWRP Recovery Mode.
F. Install SuperSu and Root Redmi 4A
- Select the language and then Swipe to allow modification then mount storage like this.
- Now go to the main menu
- Click Backup and back up the current ROM for security. You can skip this, it’s up to you,
- If the backup process is complete again go to the main menu and press Install
- Then look for UPDATE-SuperSU-v2.76-20160630161323 and Swipe to Install files
- After the flashing process is complete, press Wipe Cache / Delvik
- Then press Reboot your system.
- The boot process can take 5 to 10 minutes.
- Install Root Checker and whether Redmi 4A is rooted or not.
- Done.