
In this tutorial, I will tell you how to install and create a private VPN on a VPS server with OpenVPN. OpenVPN is a client/open-source VPN server. It creates a VPN rather easily on any Linux or Windows machine and connect to it with virtually all operating systems.

Want to access the internet safely via mobile or desktop devices when connected to an insecure network such as WiFi in a hotel or coffee shop? Virtual Private Network (VPN) can be a solution for you to secure a secure and private connection such as connecting to a private network.
In the guide on how to create a VPN server, we will use OpenVPN. OpenVPN is a full-featured open-source VPN solution with Secure Socket Layer (SSL). We will create a VPN server on a Linux VPS and configure a VPN client on Linux or Windows. This guide will discuss the installation process and the simple configuration steps.
For VPN, I will use the virtual network 10.8.0.0/24 and Google DNS: 8.8.8.8 and 8.8.4.4.
Steps To Install Private VPN On VPS Server
Needs that need to be prepared
Before executing the VPN Server creation guide, there are a number of needs that you need to prepare so that the installation and configuration process can run properly.
- Server access (root)
- VPS/Computers with the CentOS 7 Linux operating system
After these conditions are ready, you can proceed to the step-by-step steps to create a VPN server using OpenVPN.
1. Connect To server
At first, you need to connect your server by using any SSH tools. Or you can direct access your server via Console.
2. Download the ‘openvpn-install.sh’ script
Use wget to retrieve executable files that are used to install OpenVPN Server automatically.
yum -y update

wget https://git.io/vpn -O openvpn-install.sh
3. Run openvpn-install.sh to install OpenVPN Server
Then run the openvpn-install.sh file to install the OpenVPN server.
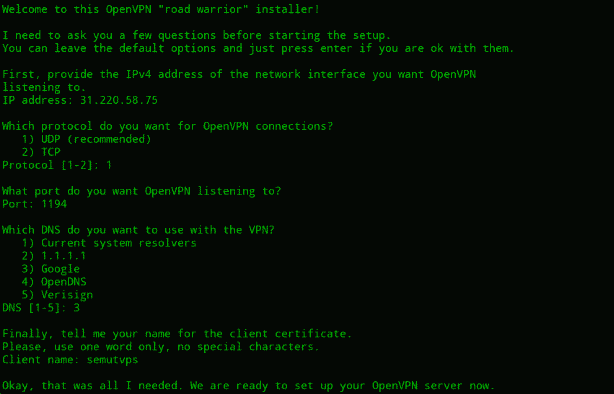
sudo bash openvpn-install.shWhen it appears to enter the IP address and port, enter the server’s IP address and port ‘ 1194 ‘ then press the “Enter” key. Or you can adjust the configuration above. Make sure the IP address is the same as the server.
 It’s done! OpenVPN server has been successfully configured and is ready to use.
4. Configuring and Setting VPN for Client
In this example, we will use Linux and Android to try VPN servers that have already been installed and configured. The first step you need to do is download the file that was created during the installation process – in the example above the file name is techvps.ovpn.
On your local computer or device, just type the command.
scp username @ ip_addressServer: ~ /(filename).ovpnExample:
scp [email protected]: ~ /techvps.ovpnThis command will copy the VPN configuration file for the client to the local computer.
How To Connect OpenVpn On Android
The first thing that needs to be done is to copy the .ovpn file to the mobile device. You can use the SCP function or other applications to move the .ovpn file from the server to a mobile/desktop device.
- Download install OpenVPN apps from play store
- Now Upload .ovpn file to the app
- When the .ovpn file has been uploaded, all you have to do is activate it
- Now check your IP address on Google.
- Done
Conclusion
This guide discusses how to create a VPN server using OpenVPN and configure it with the client. After completing this guide you can use the connection using a VPN server that you have created yourself. You can use Ubuntu, Android, or other operating systems that support the use of OpenVPN or VPN features.


