
The latest Windows operating systems, including Windows 10/11 are mainly known for their exciting features. But sometimes, you may encounter issues with the SSDs of your device, especially after upgrading its OS. Windows 11 comes with several preset SSD configurations, but their performance decreases with time. When you experience problems, like the slow performance of your device SSD, you need to apply some methods to optimize it.

If you have recently upgraded to Windows 11 and facing slow SSD performance, apply some quick SSD performance-boosting fixes. Microsoft has recently released an update to fix the slow SSD performance problems on Windows OS. Here, in this article, we have mentioned several methods for SSD Optimization on Windows 10/11 systems.
Table of Contents
Quick Steps to Optimize SSD on Windows 10/11
In this part of the blog, we have provided some quick methods that you can apply to optimize the SSDs on your Windows 10 or Windows 11 systems.
Method 01: Optimize SSD through Windows Update
After the release of Windows 11 OS, many users encounter issues like the slow performance of their SSDs. To overcome this issue, Microsoft has released the Windows 11 KB5007262 update. These Windows update allows you to fix several SSD performance issues and also improves its performance.
However, if you don’t have the KB5007262 update installed on your device, you can download it by applying the below-mentioned steps:
- Click on the Start menu and search for Settings. Else, press the Windows + I key simultaneously to open the Windows app.
- Now, click on the Windows Update option located on the left navigation pane.
- Tap “Check for Updates” and once the available updates appear on the screen, check for the KB5007262 update. If the update is available, Windows 11 will then automatically install it in your system.
- After successfully installing the update, click on the “Restart now” button to save the changes.
If the KB5007262 update is not available for automatic download, you can download it from the Microsoft Update Catalog. Make sure you are downloading the x64 version of the update. After properly installing the update, install it and restart your system.
Method 02: Fix File System Issues in SSD
Go through the following steps to fix the file system errors in SSD:
- Firstly, in the search box located in the bottom-left corner, search for “Command Prompt”.
- After that, click the “Run as Administrator” option.
- At last, type “chkdsk C: /f /r /x” and press Enter button.
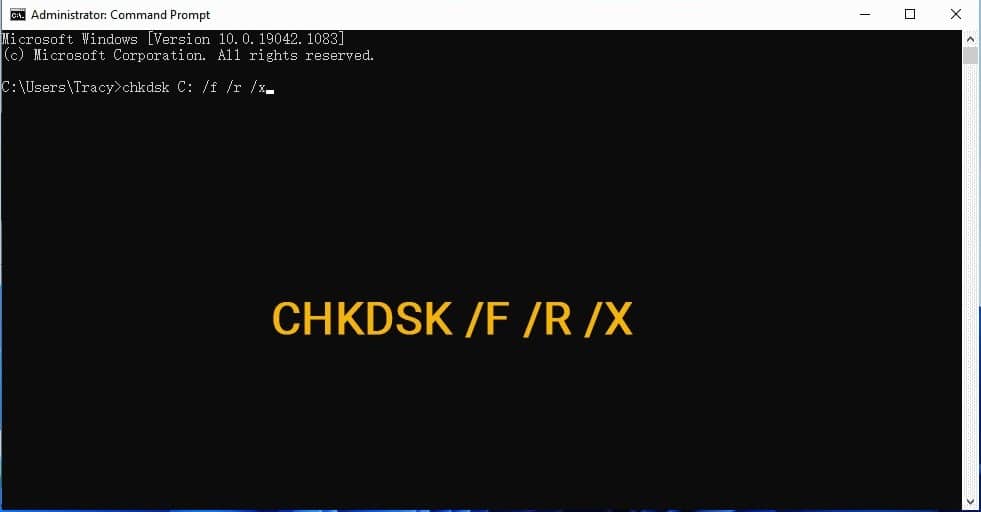
Here, the letter “C” is for the corrupted drive. You need to mention the corrupted drive in your SSD in place of C. And after successful completion of the process, exit the command prompt.
Method 03: Turn Off Fast Startup
SSDs reduce the actual time of the booting process, and Fast Startup also allows you to perform the same task. The booting time of your device depends on the startup programs that run when you turn on your computer. It is better to disable the Fast Startup and allow your system to boot properly. Go through the below-mentioned steps to turn off Fast Startup:
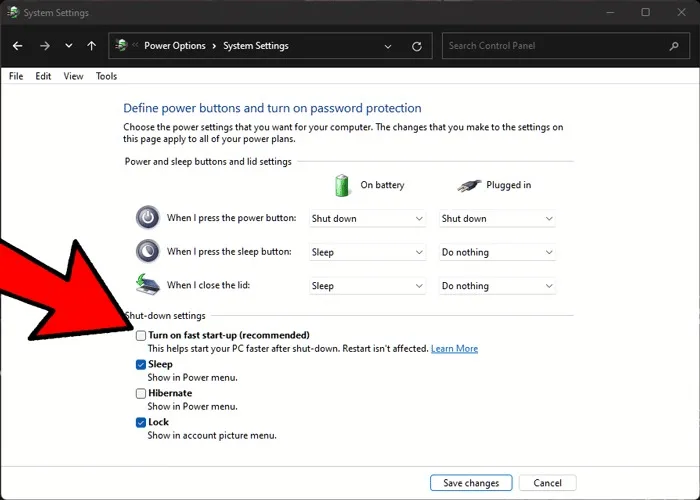
- Type CP in the search box of your Windows device. Select Control Panel from the navigation pane to open it.
- Navigate to Hardware and Sound and tap the “Power Options” option.
- Click the “Change what the power button does” link followed by a click on the “Change settings that are currently available” link.
- Now, untick the box next to the “Turn on fast startup” option located under Shutdown settings.
- At last, tap the “Save Changes” button.
That’s it! The above steps will optimize the performance of your SSD on Windows 10/11 systems. Instances may occur when you lose documents, photos, videos, or any other file after the above steps. In such cases, you can use Windows data recovery software to get your deleted files back. There are several online software, like Stellar Data Recovery -Standard available online that can help you to recover files of multiple formats and on different storage devices.
Method 04: Check If TRIM Is Enabled
Windows TRIM feature allows you to notify an SSD to clean data from blocks that you might not need for long. This reduces the write speed and maintains the optimum performance of the SSD throughout its lifespan. For this, you can follow the below-given steps to enable the TRIM feature on your Windows 10/11 device:
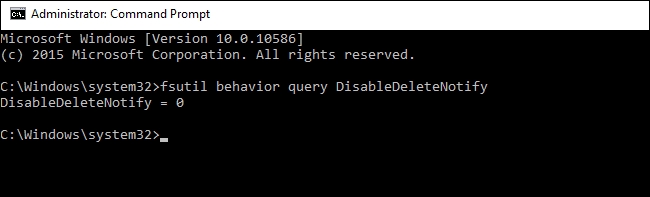
- Firstly, type CMD in the search box of your Windows device and then right-click on the “Command Prompt”. Select the “Run as administrator” option from the menu.
- Next, type the “fsutilbehavior query DisableDeleteNotify” command and press Enter key.
- If the value appearing on the screen is “0”, it means TRIM is enabled. Otherwise, if it is “1”, it indicates that TRIM is disabled, and you must have to enable it.
Method 05: Turn ON Advanced Host Controller Interface (AHCI)
AHCI or Advanced Host Controller Interface ensures that your Windows device supports all the capabilities that occur while operating an SSD. It also helps you to manage all such functions, particularly TRIM, which prevents your device from data that is no longer required. Go through the below-given steps to set the SATA mode to AHCI:
- Firstly, press the Windows + I keys to open the Settings app. Tap the “Update & Security” button.
- Now, from the left navigation pane, click on the “Windows Update” option and tap the “Advanced options” button.
- Choose the “Recovery” option and then click on the “Restart now” button.
- Then, your Windows device will restart and boot into the recovery environment. After that, tap the “Troubleshoot” button.
- Choose the “Advanced options“. Click on the “UEFI Firmware Settings“.
- Tap the “Restart” button.
- Once your PC successfully restarts, check if it automatically displays the BIOS menu. If you have a new device, the Startup Menu will appear on the screen. From there, select the “BIOS Setup” option and its corresponding key.
- Navigate to the advanced menu and change it from IDE or RAID to AHCI. It is important to note here that each device has a different BIOS interface, so make sure you are selecting only as per your device.
- At last, save the changes and exit.
Method 06: Configure Write Caching
Just like Trim, Windows OS provides the most important feature, known as Write Caching. On some devices, it provides a better experience while on some, it degrades the SSD’s performance. So, it is not always good to turn on the write caching feature on your device. If there is any sort of power outage or device malfunction, this feature may lead to data corruption or loss. Given below are some quick steps that you can apply to enable the write caching feature on your device:
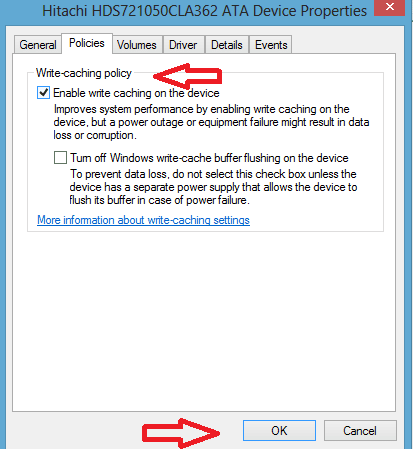
- Firstly, press the Windows and X keys and from the menu that appears on the screen, choose “Device Manager”.
- Locate and tap on “Disk Drives” to expand it. Navigate to Properties.
- Now, from the Properties window, go to the Policies tab. Locate the Write-caching policy section.
- Next, check the box adjacent to the “Enable write caching on the device” option and click the OK button.
After completing the above steps, try to normally use your SSD and check if it is working fine. If there is any data loss on your device, try free data recovery software to get those files back. This software helps you to recover lost, deleted, and formatted files of multiple formats and from all types of storage drives.
Conclusion:
Microsoft releases updates for the Windows Operating system on regular basis. But sometimes, you may experience problems, like the slow performance of the SSD of your Windows 10/11 device. These issues mainly occur after installing the updates on your device. In such cases, you need to apply some quick methods that can optimize SSD performance. This guide will help you with various methods for SSD optimization on Windows 10/11 devices. Just apply these methods to improve the performance of your device’s SSD.