
Are you a lucky owner of the latest version of Macbook? It’s a great example of a technological breakthrough but it doesn’t mean that you won’t face any problems when using it. You never know when some factors may cause damage to the hard drive. Do you wonder whether it is possible to recover data from Macbook hard drive in case of some emergency? Don’t worry! You can do this on your own if you have a clear understanding of the recovery process.
What Should You Do to Get Back Valuable Files?
Learn the steps to recover files from a Macbook Macbook and be prepared to deal with any challenge.
Step 1: Use a Disk Utility App
Every owner of a Macbook has a disk utility app. So, why not give it a try? Nothing is easier than that. You should just launch the app and choose “First Aid”. This option may help you to fix possible errors on your hard drive. The whole process won’t take you long.
Step 2: Download Mac data recovery tool
Have you tried the previous method and it didn’t work? No need to start panicking. You should download one of the most powerful recovery tools for Mac – Disk Drill. It’s a program that has been designed to recover files from Macbook hard drive with almost 100% guarantee. It can help you to get back files even from an emptied trash on Mac. Just enter the official website of this software, download it, install, and run. One thing to remember: you shouldn’t save it and install it on the drive where the lost files were.
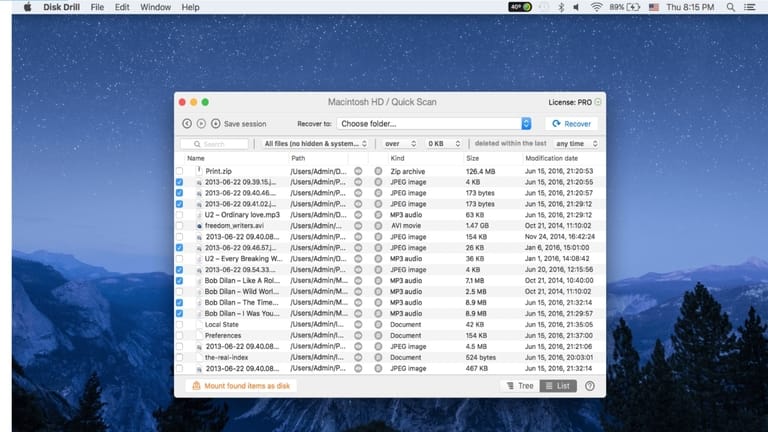
Step 3: Recover deleted files on Mac using Disk Drill
Now, you have a Disk Drill recovery tool on your Mac and it’s high time to start scanning your hard drive. Open the program and choose the hard drive to restore. It’s possible in case it’s in the working condition. In this case, the tool will show it in the list of the disks and help to restore all the documents that were lost. This process usually takes minutes but in some cases, it may be hours. You should wait for the end of the recovery patiently. You won’t get the necessary result if you interrupt it.
Nothing is easier than the recovery process with Disk Drill. It’s the best way to save time and nerves when you need to get files back as quickly as possible.
Step 4. Check what files have been found
Do you want to restore lost data on Mac? Disk Drill is the most convenient tool for doing this. It has a lot of user-friendly features. Among them is an opportunity to look through the files found and choose the one you need instead of recovering all of the folders. Just preview the files and select those you’d like to get back.
Step 5. Recover files from hard drive
Have you chosen the files for the recovery? Then, the final step is left. You need to press the Recovery button and the tool will restore the necessary file. There is one important thing to bear in mind when you recover data from the hard drive. Choose some other location for the files you’re going to recover. Don’t select the same place where you recover them from.
Step-by-Step Video Tutorial
Everyone Can Recover Files with Disk Drill
Whether you are using data recovery software for the first time or you’re an experienced user, you won’t find any difficulties. The whole process is intuitive and simple. One of its key advantages is that you can restore files on your own spending minimum time and effort. Moreover, you can do this for free. Has your hard drive crashed? Or maybe you deleted some important files by chance? It isn’t as horrible as you may think first. Just install Disk Drill and recover files in several clicks.
")

