Disable automatic login in Windows 11 laptop devices with password protection to protect our devices from the reach of others.
his is very effective when you apply it to general situation conditions, where you are doing activities in an open space, or an office space that contains many members.
The goal is transparent so that users other than us can not just enter but operate the computer without the owner’s knowledge.
This automatic login appears after the device is turned on, active from hibernation alias sleep until restarting Windows.
After booting, it appears that Windows will provide login confirmation access to the user password as an initial protection step.
But this security feature feels less practical when we don’t really need it. If you are a single person who only operates the device, even in closed area conditions, this Windows login feature is actually optional to activate or deactivate.
Now for users who don’t really want the automatic login feature on their Windows system, below we have summarized a discussion on how to disable automatic login in Windows 11. Please follow the steps below to the end.
3 Steps Disable Automatic Login in Windows 11

Windows 11 is included in the latest Windows operating system with a myriad of complete features that are abundant.
Without reducing the functionality of the previous generation version, Windows 11 users will still get a new level of automatic login security.
This is a form of service and features in Windows in protecting users’ devices from the reach of others. If the worst conditions happen to your laptop, at least the person holding this unauthorized access can’t just enter, let alone operate it deep inside.
Now, how to disable automatic login in Windows 11, we hope you have gone through some of your considerations including protecting computer privacy.
We recommend the following method if you are only a single user of your Windows device, then often use it in closed areas such as your home, or private office, which are safe from the reach of others.
1. Via User Account
In the User Account window, we can manage all forms of management related to users registered on our Windows devices, such as setting passwords, resetting passwords, and deleting the user list.
In this tutorial, the trick to turning off automatic login access can be done simply by turning off the command user must enter a username and password to use this computer. With the condition that you must know the password combination as a verification command when this setting is being carried out by the user concerned.
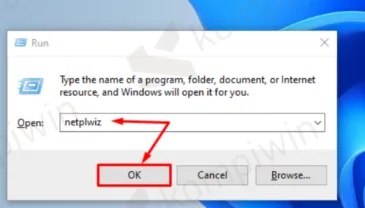
1. First press the shortcut Windows + R.
2. After exiting the Run window, type ” netplwiz”

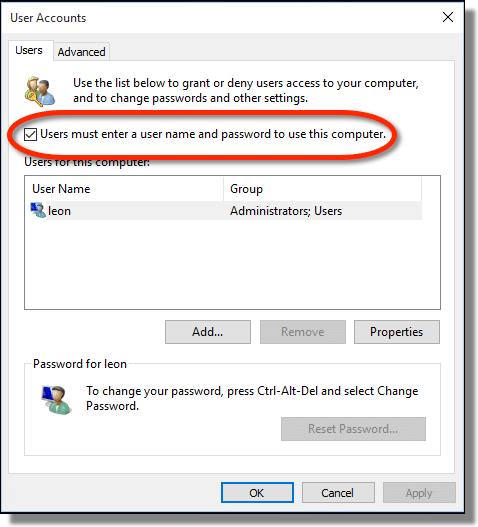
3. After that, the User Accounts settings will open, go to the Users section .
4. Turn off the User must enter a username and password to use this computer menu.
5. Select the list of usernames you set in the box below.

6. Finally tap the Apply button.
7. When Sign in automatically appears, please enter your Username, Password and confirm the password once. The purpose of this is as an authentication step to ensure that the main user takes part in making changes to the settings.
8. Then press OK.
9. Click the OK button again.
10. If you have crossed this User Accounts window.
11. And try restarting your computer.
2. Through Windows Hello Windows 11
Many new things we can find in Windows 11 settings, including Windows Hello. They have perfected many things including in terms of security.
And one of the following advantages of Windows Hello, we can get an automatic sign-in facility.
When the feature is activated, the protection system will include facial recognition, fingerprint authentication, and also a PIN.
If you want to turn off automatic login, then we have to remove this system configuration from Windows 11 settings.
- First please tap the Start button.
- Then you select the Settings menu.
- If it’s already open, navigate to the Accounts sub-menu.
- Scroll down to the Additional Settings section. Look here for the For improved security section, only allow Windows Hello sign-in for Microsoft accounts on this device to be Off.
- Then also set the If you’re been away, when should Windows require you to sign in again? Be Never.
- Scroll down again and find Windows PIN, and press it to open its settings. Then you can select Remove.
- Enter the password or PIN code to verify the changes to make sure you are the main user who is changing this configuration.
- If it’s all you have to do is restart the computer or laptop.
3. Via Group Policy
As for how to disable automatic login in Windows 11, you can go through the Group Policy program window. In it, we can manage all matters related to system programs in Windows.
It looks complicated, but whatever the type of configuration found in Windows 11 it is very possible for us to change it easily.
One of those things is to turn off this automatic login. need to take a few steps such as visiting file folders, until you find a program called Do not display the Getting Started welcome screen at login. We have summarized the detailed explanation below.
- First, tap again the shortcut Windows + R.
- When the Run window appears, type ” gpedit.msc “. After that tap OK.
- First press the arrow next to Computer Configuration
- Press the arrow next to Administrative Templates again.
- Tap again the arrow next to the System folder.
- Scroll down and find the Logon folder, click on it to open it.
- Look for the program menu on the right side named Do not display the Getting Started welcome screen at login.
- Then double-click to open it.
- Change the mode to Enable
- Finally, click Apply then OK.
- And restart your device.
The final word
So that’s how to disable automatic login in Windows 11, please follow these steps to eliminate login access after booting Windows.
However, also know the consequences when turning off this security system, the device becomes less secure and cannot protect the access of unknown people. May be useful.


